Introducción a la Interfaz de Línea de Comandos
Como operador de nodo, la CLI es tu herramienta principal para interactuar con Rocket Pool.
La usarás para crear nuevos minipools, verificar el estado de todo, reclamar recompensas periódicas de RPL, salir y retirar de tus minipools cuando estés listo, y una variedad de otras actividades.
Una vez que hayas terminado de sincronizar las cadenas Execution y Beacon, todos los comandos estarán disponibles para que los uses.
En esta sección, haremos un breve recorrido por algunos de los más comunes y otros trucos que la CLI puede hacer.
Aprender sobre los Comandos
Para listar todos los comandos disponibles, escribe:
La salida se verá así:
______           _        _    ______           _
| ___ \         | |      | |   | ___ \         | |
| |_/ /___   ___| | _____| |_  | |_/ /__   ___ | |
|    // _ \ / __| |/ / _ \ __| |  __/ _ \ / _ \| |
| |\ \ (_) | (__|   <  __/ |_  | | | (_) | (_) | |
\_| \_\___/ \___|_|\_\___|\__| \_|  \___/ \___/|_|

Authored by the Rocket Pool Core Team
A special thanks to the Rocket Pool community for all their contributions.

NAME:
   rocketpool - Rocket Pool CLI

USAGE:
   rocketpoolcli [global options] command [command options] [arguments...]

VERSION:
   1.19.1

COMMANDS:
   auction, a   Manage Rocket Pool RPL auctions
   claims, l    View and claim all available rewards and credits across the node
   minipool, m  Manage the node's minipools
   megapool, g  Manage the node's megapool
   network, e   Manage Rocket Pool network parameters
   node, n      Manage the node
   odao, o      Manage the Rocket Pool oracle DAO
   pdao, p      Manage the Rocket Pool Protocol DAO
   queue, q     Manage the Rocket Pool deposit queue
   security, c  Manage the Rocket Pool security council
   service, s   Manage Rocket Pool service
   wallet, w    Manage the node wallet
   help, h      Shows a list of commands or help for one command

GLOBAL OPTIONS:
   --allow-root, -r              Allow rocketpool to be run as the root user
   --config-path path, -c path   Rocket Pool config asset path (default: "~/.rocketpool")
   --daemon-path path, -d path   Interact with a Rocket Pool service daemon at a path on the host OS, running outside of docker
   --maxFee value, -f value      The max fee (including the priority fee) you want a transaction to cost, in gwei (default: 0)
   --maxPrioFee value, -i value  The max priority fee you want a transaction to use, in gwei (default: 0)
   --gasLimit value, -l value    [DEPRECATED] Desired gas limit (default: 0)
   --nonce value                 Use this flag to explicitly specify the nonce that this transaction should use, so it can override an existing 'stuck' transaction
   --debug                       Enable debug printing of API commands
   --secure-session, -s          Some commands may print sensitive information to your terminal. Use this flag when nobody can see your screen to allow sensitive data to be printed without prompting
   --help, -h                    show help
   --version, -v                 print the version

COPYRIGHT:
   (c) 2026 Rocket Pool Pty Ltd
Comandos de Servicio
El grupo de servicio implica administrar los diversos servicios que el smart node administra por ti.
Esto es lo que mostrará la salida de rocketpool service help:
NAME:
   rocketpool service - Manage Rocket Pool service

USAGE:
   rocketpool service [global options] command [command options] [arguments...]

VERSION:
   1.19.1

COMMANDS:
   install, i                 Install the Rocket Pool service
   config, c                  Configure the Rocket Pool service
   status, u                  View the Rocket Pool service status
   start, s                   Start the Rocket Pool service
   pause, p                   Pause the Rocket Pool service
   stop, o                    Pause the Rocket Pool service (alias of 'rocketpool service pause')
   reset-docker, rd           Cleanup Docker resources, including stopped containers, unused images and networks. Stops and restarts Smart Node.
   prune-docker, pd           Cleanup unused Docker resources, including stopped containers, unused images, networks and volumes. Does not restart smartnode, so the running containers and the images and networks they reference will not be pruned.
   logs, l                    View the Rocket Pool service logs
   stats, a                   (DEPRECATED) No longer supported. Use 'docker stats -a' instead
   compose                    View the Rocket Pool service docker compose config
   version, v                 View the Rocket Pool service version information
   prune-eth1, n              Shuts down the main ETH1 client and prunes its database, freeing up disk space, then restarts it when it's done.
   install-update-tracker, d  Install the update tracker that provides the available system update count to the metrics dashboard
   get-config-yaml            Generate YAML that shows the current configuration schema, including all of the parameters and their descriptions
   resync-eth1                Deletes the main ETH1 client's chain data and resyncs it from scratch. Only use this as a last resort!
   resync-eth2                Deletes the ETH2 client's chain data and resyncs it from scratch. Only use this as a last resort!
   terminate, t               Deletes all of the Rocket Pool Docker containers and volumes, including your ETH1 and ETH2 chain data and your Prometheus database (if metrics are enabled). Also removes your entire `.rocketpool` configuration folder, including your wallet, password, and validator keys. Only use this if you are cleaning up the Smart Node and want to start over!

GLOBAL OPTIONS:
   --compose-file value, -f value  Optional compose files to override the standard Rocket Pool docker compose YAML files; this flag may be defined multiple times
   --help, -h                      show help
status
Este comando te muestra el estado de ejecución actual de cada uno de los contenedores Docker administrados por Rocket Pool.
Por ejemplo, la salida de la instalación predeterminada de Docker se ve así:
        Name                       Command              State                                                       Ports
------------------------------------------------------------------------------------------------------------------------------------------------------------------------------
rocketpool_api          /bin/sleep infinity             Up
rocketpool_eth1         sh /setup/start-node.sh         Up      0.0.0.0:30303->30303/tcp,:::30303->30303/tcp, 0.0.0.0:30303->30303/udp,:::30303->30303/udp, 8545/tcp, 8546/tcp
rocketpool_eth2         sh /setup/start-beacon.sh       Up      0.0.0.0:9001->9001/tcp,:::9001->9001/tcp, 0.0.0.0:9001->9001/udp,:::9001->9001/udp
rocketpool_node         /go/bin/rocketpool node         Up
rocketpool_validator    sh /setup/start-validator.sh    Up
rocketpool_watchtower   /go/bin/rocketpool watchtower   Up
Puedes usarlo para verificar rápidamente si alguno de los contenedores Docker está teniendo problemas, o para asegurarte de que un comando start o stop funcionó correctamente.
start y stop
Estos dos comandos ya te son familiares.
Simplemente inician todos los contenedores de Rocket Pool, o los detienen.
Tip
El comando pause hace lo mismo que stop.
Solo se mantiene como un comando heredado de versiones anteriores de Rocket Pool.
logs
Este es otro comando que ya deberías haber visto.
Puedes usarlo para ver los registros de salida de cada contenedor Docker.
Esto puede ser útil para solucionar problemas u obtener un informe de estado más detallado de ellos.
Si simplemente haces rocketpool service logs sin ningún otro argumento, agregará todos los registros juntos y te los mostrará a la vez.
Si quieres enfocarte en la salida de un contenedor, puedes agregar un argumento al final para especificar el contenedor.
Los valores válidos son eth1, eth2, validator, api, node, watchtower, prometheus, grafana y node-exporter.
stats
Este comando te muestra algunas estadísticas de recursos de cada uno de los contenedores, que puedes usar para perfilar el consumo de hardware y red de cada uno.
Puede resultarte útil para monitorear los contenedores si tu sistema comienza a funcionar lento o tiene problemas de RAM.
Aquí hay una salida de ejemplo:
CONTAINER ID   NAME                    CPU %     MEM USAGE / LIMIT     MEM %     NET I/O           BLOCK I/O         PIDS
62314e5a0ecf   rocketpool_api          0.00%     18.89MiB / 62.78GiB   0.03%     50.6kB / 31.1kB   57.4MB / 0B       1
ac629c08c896   rocketpool_eth1         5.44%     18.13GiB / 62.78GiB   28.88%    1.63GB / 1.66GB   24.4GB / 37.7GB   27
4dfc7a2e939b   rocketpool_eth2         97.39%    2.369GiB / 62.78GiB   3.77%     1.79GB / 45MB     333MB / 24.1GB    2
a3c22f54eff0   rocketpool_node         0.00%     12.13MiB / 62.78GiB   0.02%     308kB / 504kB     0B / 0B           15
0d5818868ef6   rocketpool_validator    0.00%     936KiB / 62.78GiB     0.00%     12.1kB / 0B       4.57MB / 0B       2
88bea525fa89   rocketpool_watchtower   0.00%     12.05MiB / 62.78GiB   0.02%     304kB / 503kB     0B / 0B           16
NOTA
La estadística de RAM aquí muestra memoria total asignada, que incluye memoria virtual.
No muestra el consumo de memoria residente sin procesar.
De manera similar, el uso de CPU muestra la cantidad total de consumo de CPU promediada en todos los núcleos de CPU que usa el contenedor.
Aquí, la CPU para ETH2 muestra casi 100% porque está usando Nimbus, que es de un solo hilo.
Puedes encontrar que un programa como htop o btop ofrece una mejor perspectiva del consumo real de recursos.
config
Este comando ejecuta la entrevista de configuración nuevamente.
Puedes usarlo si quieres cambiar tu selección de cliente Execution o Consensus, o cambiar algunos de los parámetros que especificaste inicialmente cuando los seleccionaste (como el mensaje de graffiti de tu validador, el número máximo de pares a los que conectarte, etc.).
Puedes llamar a este comando en cualquier momento, pero los cambios no surtirán efecto hasta que llames a rocketpool service stop y rocketpool service start.
terminate
Este comando apagará los contenedores Docker, luego los eliminará, eliminará la red virtual de Rocket Pool y eliminará los volúmenes de datos de la cadena ETH1 y ETH2.
Esencialmente elimina todos los elementos de Rocket Pool de tu configuración de Docker.
Úsalo cuando quieras limpiar esa parte de la instalación de Rocket Pool.
Warning
Esto eliminará irreversiblemente tus datos de cadena, lo que significa que tendrás que sincronizar ETH1 y ETH2 nuevamente.
Esto no eliminará tus archivos de wallet y contraseña, tu configuración establecida o tus claves de validador.
Para eliminar esos, deberás eliminar la carpeta ~/.rocketpool/data en Docker o Modo Híbrido, o el directorio correspondiente en Modo Nativo.
Comandos de Nodo
El grupo node implica operaciones en tu nodo de Rocket Pool.
Cubriremos estos con más profundidad en la siguiente sección donde creamos un minipool, pero puede ser útil verlos todos de un vistazo.
Esto es lo que mostrará la salida de rocketpool node help:
NAME:
   rocketpool node - Manage the node

USAGE:
   rocketpool node command [command options] [arguments...]

COMMANDS:
   status, s                                     Get the node's status
   sync, y                                       Get the sync progress of the eth1 and eth2 clients
   register, r                                   Register the node with Rocket Pool
   rewards, e                                    Get the time and your expected RPL rewards of the next checkpoint
   set-primary-withdrawal-address, w             Set the node's primary withdrawal address, which will receive all ETH rewards (and RPL if the RPL withdrawal address is not set)
   confirm-primary-withdrawal-address, f         Confirm the node's pending primary withdrawal address if it has been set back to the node's address itself
   set-rpl-withdrawal-address, srwa              Set the node's RPL withdrawal address, which will receive all RPL rewards and staked RPL withdrawals
   confirm-rpl-withdrawal-address, crwa          Confirm the node's pending rpl withdrawal address if it has been set back to the node's address itself
   allow-rpl-locking, arl                        Allow the node to lock RPL when creating governance proposals/challenges
   deny-rpl-locking, drl                         Do not allow the node to lock RPL when creating governance proposals/challenges
   set-timezone, t                               Set the node's timezone location
   swap-rpl, p                                   Swap old RPL for new RPL
   stake-rpl, k                                  Stake RPL against the node
   add-address-to-stake-rpl-whitelist, asw       Adds an address to your node's RPL staking whitelist, so it can stake RPL on behalf of your node.
   remove-address-from-stake-rpl-whitelist, rsw  Removes an address from your node's RPL staking whitelist, so it can no longer stake RPL on behalf of your node.
   claim-rewards, c                              Claim available RPL and ETH rewards for any checkpoint you haven't claimed yet
   withdraw-rpl, i                               Withdraw RPL staked against the node
   withdraw-eth, h                               Withdraw ETH staked on behalf of the node
   withdraw-credit, wc                           (Saturn) Withdraw ETH credit from the node as rETH
   deposit, d                                    Make a deposit and create a minipool
   create-vacant-minipool, cvm                   Create an empty minipool, which can be used to migrate an existing solo staking validator as part of the 0x00 to 0x01 withdrawal credentials upgrade
   send, n                                       Send ETH or tokens from the node account to an address. ENS names supported. Use 'all' as the amount to send the entire balance. <token> can be 'rpl', 'eth', 'fsrpl' (for the old RPL v1 token), 'reth', or the address of an arbitrary token you want to send (including the 0x prefix).
   set-voting-delegate, sv                       (DEPRECATED) Use `rocketpool pdao set-signalling-address` instead
   clear-voting-delegate, cv                     (DEPRECATED) Use `rocketpool pdao clear-signalling-address` instead
   initialize-fee-distributor, z                 Create the fee distributor contract for your node, so you can withdraw priority fees and MEV rewards after the merge
   distribute-fees, b                            Distribute the priority fee and MEV rewards from your fee distributor to your withdrawal address and the rETH contract (based on your node's average commission)
   join-smoothing-pool, js                       Opt your node into the Smoothing Pool
   leave-smoothing-pool, ls                      Leave the Smoothing Pool
   sign-message, sm                              Sign an arbitrary message with the node's private key
   send-message                                  Send a zero-ETH transaction to the target address (or ENS) with the provided hex-encoded message as the data payload
   claim-unclaimed-rewards, cur                  Sends any unclaimed rewards to the node's withdrawal address
   provision-express-tickets, pet                Provision the node's express tickets

OPTIONS:
   --help, -h  show help
A continuación se muestra un resumen de algunos de los comandos que tenderás a necesitar durante la operación típica del nodo.
status
Este comando te dará una vista de alto nivel de todo tu nodo de un vistazo.
Incluye cuánto ETH y RPL tienes en stake, cuántos minipools tienes y sus estados, tu relación de colateral RPL y más.
Este es un ejemplo de lo que muestra rocketpool node status una vez que tienes tu nodo registrado y algunos minipools configurados:
=== Account and Balances ===
The node 0x4d19DE4A5a1B1B36EBaB3D5c32C01061fbDE328d has a balance of 49.402553 ETH and 0.000000 RPL.
The node has 0.000000 ETH in its credit balance and 0.000000 ETH staked on its behalf. 0.000000 can be used to make new validators.
The node is registered with Rocket Pool with a timezone location of America/Los_Angeles.

=== Megapool ===
The node has a megapool deployed at 0xCf3576c5A6e5a25AC00C9adb6751924BAe1680B1.
The megapool has 9 validators.
The node has 0 express queue ticket(s).

=== Penalty Status ===
The node does not have any penalties for cheating with an invalid fee recipient.

=== Signalling on Snapshot ===
The node does not currently have a snapshot signalling address set.
To learn more about snapshot signalling, please visit https://docs.rocketpool.net/pdao/participate#setting-your-snapshot-signalling-address.
Rocket Pool has no Snapshot governance proposals being voted on.

=== Onchain Voting ===
The node doesn't have a delegate, which means it can vote directly on onchain proposals. You can have another node represent you by running `rocketpool p svd <address>`.
The node is NOT allowed to lock RPL to create governance proposals/challenges.

=== Primary Withdrawal Address ===
The node's primary withdrawal address has not been changed, so ETH rewards and minipool withdrawals will be sent to the node itself.
Consider changing this to a cold wallet address that you control using the `set-withdrawal-address` command.

=== RPL Withdrawal Address ===
The node's RPL withdrawal address has not been set. All RPL rewards will be sent to the primary withdrawal address.

=== Fee Distributor and Smoothing Pool ===
The node's fee distributor 0x84c1f488CDecb2E335c40901E3Fe58925f4cC9A7 has a balance of 0.004897 ETH.
NOTE: You are in Native Mode; you MUST ensure that your Validator Client is using this address as its fee recipient!
The node is not opted into the Smoothing Pool.
To learn more about the Smoothing Pool, please visit https://docs.rocketpool.net/upgrades/redstone/whats-new#smoothing-pool.
You have 3 minipools that would earn extra commission if you opted into the smoothing pool!
See https://rpips.rocketpool.net/RPIPs/RPIP-62 for more information about bonus commission, or run `rocketpool node join-smoothing-pool` to opt in.

=== RPL Stake ===
NOTE: The following figures take *any pending bond reductions* into account.

The node has a total stake of 20000.000000 RPL.
This is currently 3.74% of its borrowed ETH and 30.06% of its bonded ETH.
The node has 0.000000 megapool staked RPL.
The node has 20000.000000 legacy staked RPL.
The node has a total stake (legacy minipool RPL plus megapool RPL) of 20000.000000 RPL.
You have 0.000000 RPL staked on your megapool and can request to unstake up to 0.000000 RPL

=== Minipools ===
The node has a total of 3 active minipool(s):
- 3 staking
sync
Este comando te mostrará el estado de sincronización actual de tus clientes Execution y Consensus.
Probablemente lo usarás mucho cuando configures el nodo por primera vez, luego nunca lo necesitarás de nuevo (a menos que cambies o restablezcas tus clientes).
La salida de rocketpool node sync se verá así:
Your Smartnode is currently using the Hoodi Test Network.

Your eth1 client hasn't synced enough to determine if your eth1 and eth2 clients are on the same network.
To run this safety check, try again later when eth1 has made more sync progress.

Your primary execution client is still syncing (67.12%).
You do not have a fallback execution client enabled.
Your primary consensus client is still syncing (99.94%).
You do not have a fallback consensus client enabled.
Ten en cuenta que Prysm actualmente no proporciona su porcentaje de finalización - tendrás que mirar en los logs de eth2 si lo usas.
stake-rpl
Este comando es el que usarás cuando quieras agregar más colateral RPL a tu nodo.
Hacerlo aumentará tu relación de colateral, lo que aumentará tus recompensas RPL en cada checkpoint (más sobre esto más adelante).
A diferencia de los otros comandos hasta ahora, este es en realidad interactivo porque desencadenará una transacción - no es simplemente informativo.
Primero te preguntará cuánto RPL te gustaría hacer stake, con algunas opciones predefinidas para mayor comodidad o la capacidad de especificar una cantidad personalizada:
NOTE: By staking RPL, you become a member of the Rocket Pool pDAO. Stay informed on governance proposals by joining the Rocket Pool Discord.

Please choose an amount of RPL to stake:
1: 5% of borrowed ETH (733.993926 RPL) for one validator?
2: 10% of borrowed ETH (1467.987852 RPL) for one validator?
3: 15% of borrowed ETH (2201.981778 RPL) for one validator?
4: Your entire RPL balance (20000.000000 RPL)?
5: A custom amount
Una vez que selecciones una opción, se te mostrará información sobre el precio de gas sugerido y la cantidad estimada a usar, junto con un diálogo de confirmación. Si es tu primera vez haciendo stake de RPL en el nodo, necesitarás darle aprobación al contrato de staking para interactuar con tu RPL:
Before staking RPL, you must first give the staking contract approval to interact with your RPL.
This only needs to be done once for your node.
+============== Suggested Gas Prices ==============+
| Avg Wait Time |  Max Fee  |    Total Gas Cost    |
| 15 Seconds    | 4 gwei    | 0.0001 to 0.0001 ETH |
| 1 Minute      | 4 gwei    | 0.0001 to 0.0001 ETH |
| 3 Minutes     | 4 gwei    | 0.0001 to 0.0001 ETH |
| >10 Minutes   | 4 gwei    | 0.0001 to 0.0001 ETH |
+==================================================+

These prices include a maximum priority fee of 2.00 gwei.
Please enter your max fee (including the priority fee) or leave blank for the default of 4 gwei:

Using a max fee of 4.00 gwei and a priority fee of 2.00 gwei.
Do you want to let the staking contract interact with your RPL? [y/n]
y

Approving RPL for staking...
Transaction has been submitted with hash <transaction hash>.
You may follow its progress by visiting:
https://hoodi.etherscan.io/tx/<transaction hash>

Waiting for the transaction to be included in a block... you may wait here for it, or press CTRL+C to exit and return to the terminal.

Successfully approved staking access to RPL.
RPL Stake Gas Info:
+============== Suggested Gas Prices ==============+
| Avg Wait Time |  Max Fee  |    Total Gas Cost    |
| 15 Seconds    | 4 gwei    | 0.0005 to 0.0007 ETH |
| 1 Minute      | 4 gwei    | 0.0005 to 0.0007 ETH |
| 3 Minutes     | 4 gwei    | 0.0005 to 0.0007 ETH |
| >10 Minutes   | 4 gwei    | 0.0005 to 0.0007 ETH |
+==================================================+

These prices include a maximum priority fee of 2.00 gwei.
Please enter your max fee (including the priority fee) or leave blank for the default of 4 gwei:

Using a max fee of 4.00 gwei and a priority fee of 2.00 gwei.
Are you sure you want to stake 733.993925 RPL? You will not be able to unstake this RPL until you exit your validators and close your minipools, or reach 2201.981777 staked RPL (15% of bonded eth)! [y/n]
Si confirmas, se te mostrará el hash de la transacción y se te dará un enlace a Etherscan para que puedas seguir su progreso:
Staking RPL...
Transaction has been submitted with hash <transaction hash>.
You may follow its progress by visiting:
https://hoodi.etherscan.io/tx/<transaction hash>

Waiting for the transaction to be included in a block... you may wait here for it, or press CTRL+C to exit and return to the terminal.

Successfully staked 733.993925 RPL.
La mayoría de las operaciones solo requieren una transacción, por lo que la CLI esperará hasta que se haya incluido en un bloque y luego saldrá. Sin embargo, stake-rpl es uno de los pocos comandos que requiere dos transacciones, por lo que este diálogo aparecerá dos veces.
claim-rewards
Cuando tu nodo detecta un nuevo checkpoint de recompensas, descargará automáticamente el archivo del árbol de recompensas con la información para ese intervalo (si estás usando el predeterminado de Modo de Descarga - ve abajo para información sobre generar tus propios árboles en lugar de descargarlos).
Luego puedes revisar tus recompensas usando el siguiente comando:
rocketpool node claim-rewards
A medida que pasan los intervalos y acumulas recompensas, la salida se verá así:
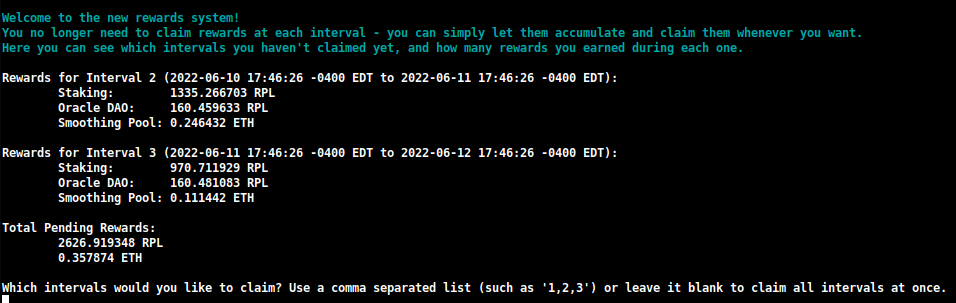
Aquí puedes ver rápidamente cuántas recompensas has ganado en cada intervalo, y puedes decidir cuáles quieres reclamar.
También puedes especificar una cantidad que quieras volver a hacer stake durante esta reclamación:

Esto te permitirá componer tus recompensas RPL en una transacción, usando sustancialmente menos gas del que actualmente necesitabas usar con el sistema de reclamación heredado.
NOTA
Si prefieres construir el checkpoint de recompensas manualmente en lugar de descargar el creado por el Oracle DAO, puedes cambiar esta configuración de Download a Generate en la TUI:
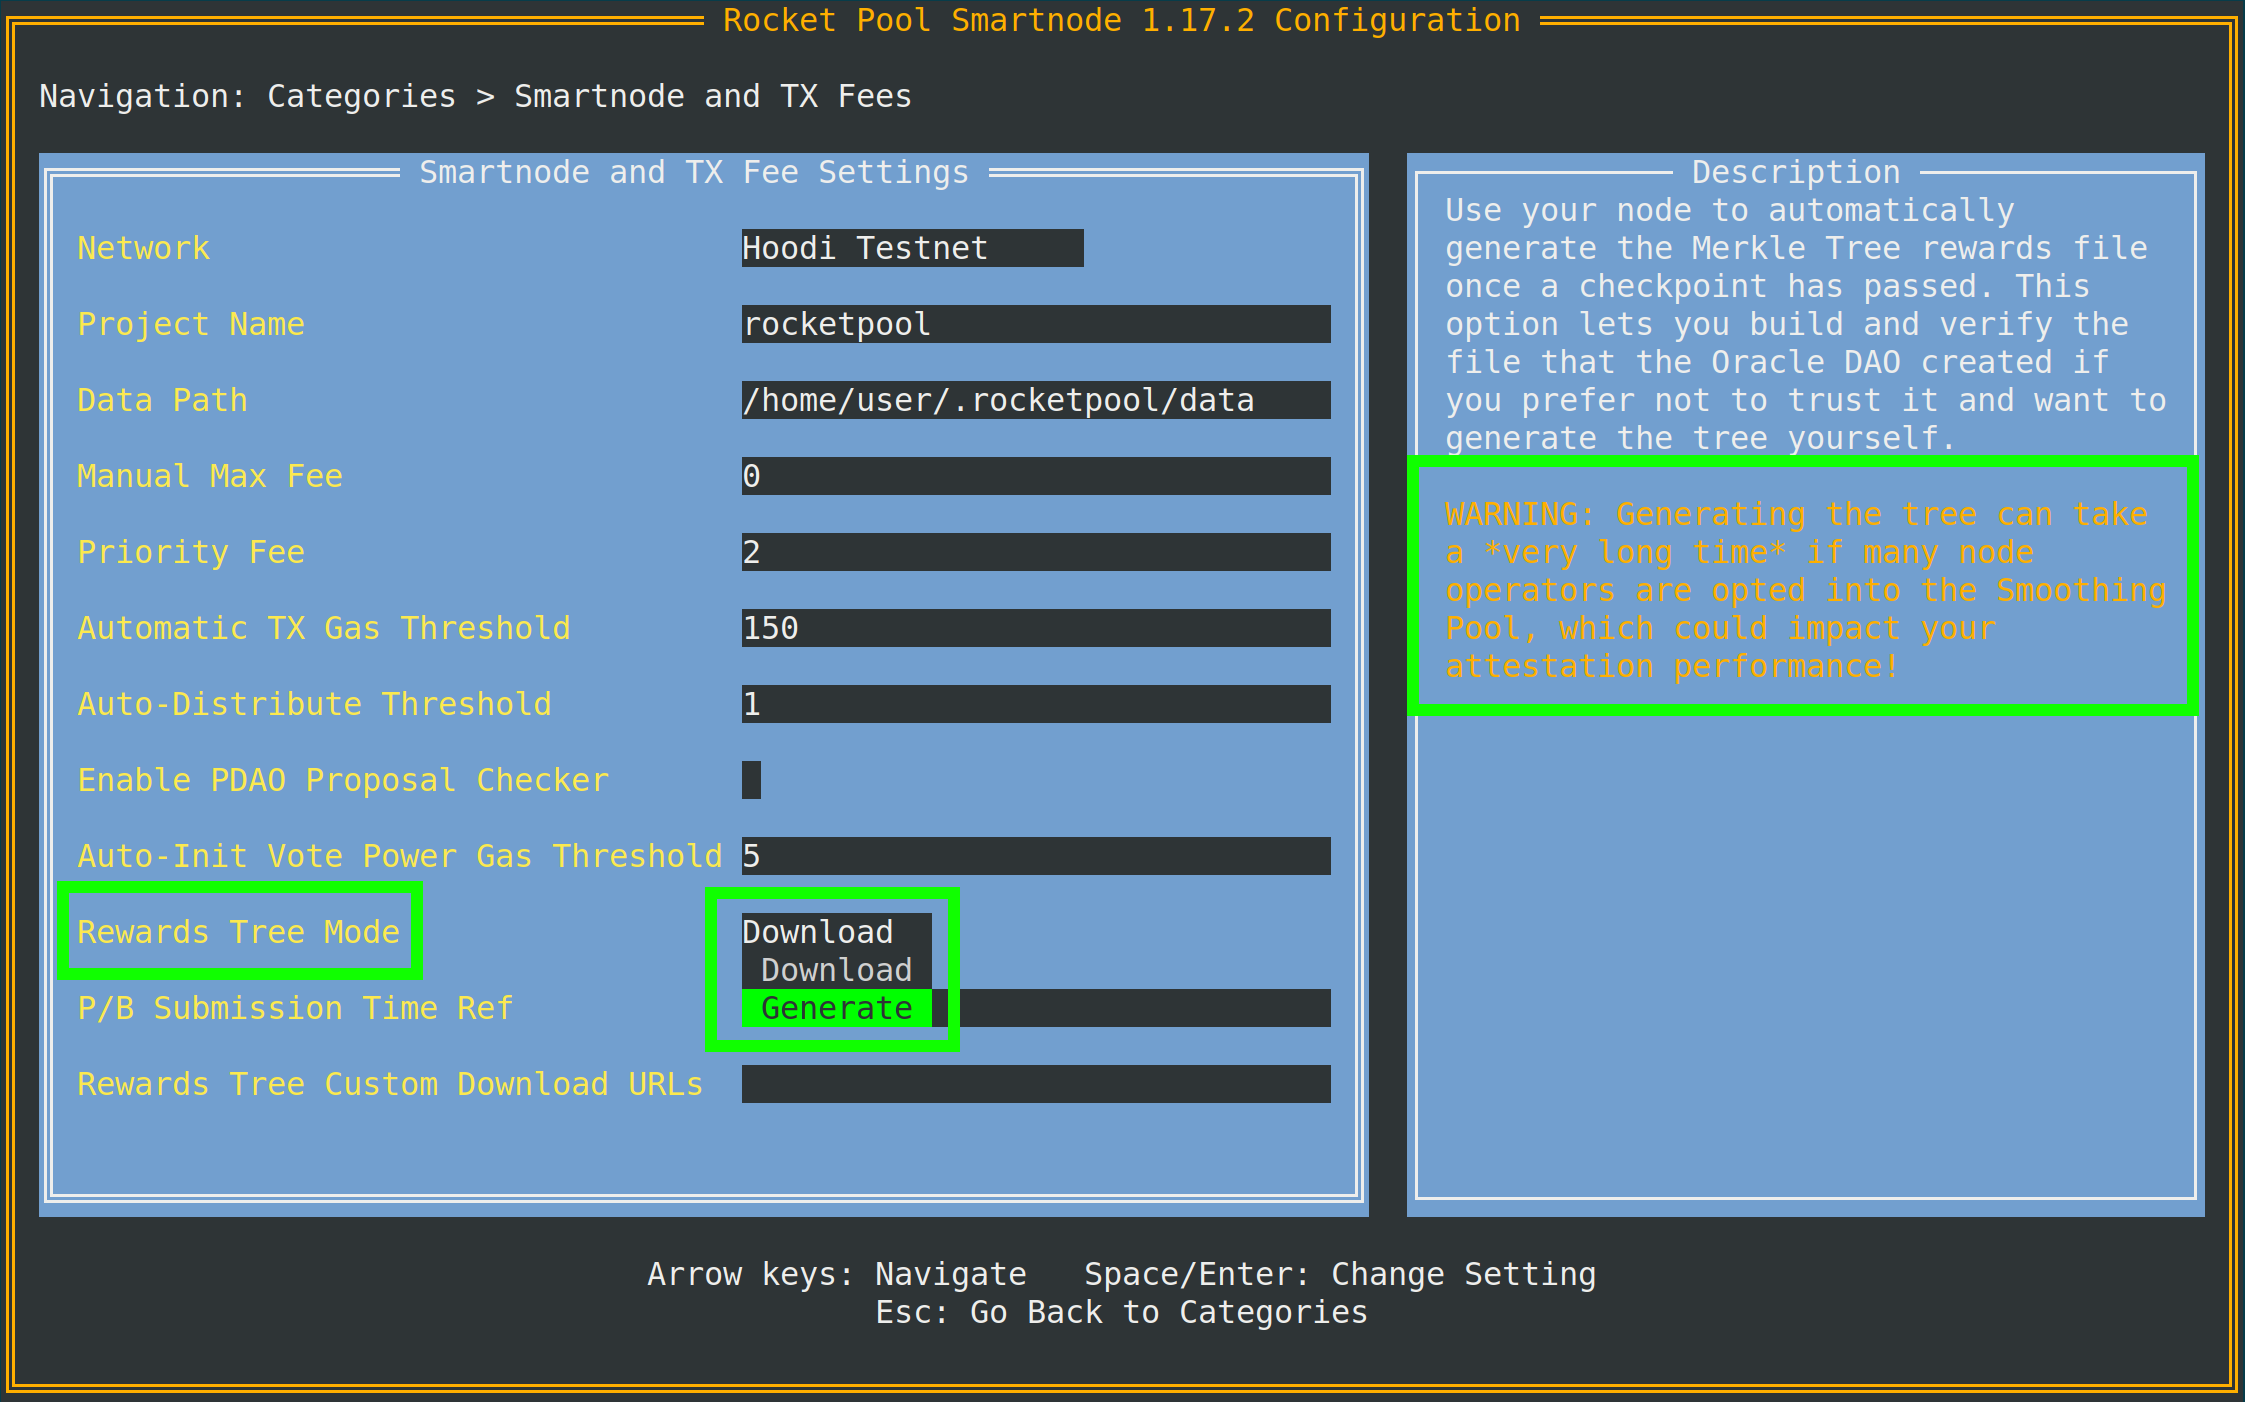
Como implica el consejo, necesitarás acceso a un nodo de archivo de cliente Execution para hacer esto.
Si tu cliente Execution local no es un nodo de archivo, puedes especificar uno separado (como Infura o Alchemy) en la Archive-Mode EC URL más abajo en el mismo menú.
Esta URL solo se usará al generar árboles Merkle; no se usará para tareas de validación.
join-smoothing-pool
rocketpool node join-smoothing-pool
Esto te registrará como participante en los contratos de Rocket Pool y cambiará automáticamente el fee recipient de tu Cliente Validador de tu contrato distribuidor del nodo al contrato del Smoothing Pool.
Ten en cuenta que una vez que te registres, hay un período de enfriamiento de 28 días (una duración completa del intervalo de recompensas) hasta que puedas salir.
leave-smoothing-pool
rocketpool node leave-smoothing-pool
Esto te sacará del Smoothing Pool si actualmente estás participando y has esperado al menos 28 días después de registrarte.
Una vez que la próxima época después de la época actual esté finalizada, cambiará automáticamente el fee recipient de tu nodo del Smoothing Pool de vuelta al contrato distribuidor de tu nodo.
Esto es para asegurarse de que no recibas penalizaciones por adelantarte al proceso de salida cuando veas que tienes una propuesta próxima.
distribute-fees
Una vez que hayas ganado recompensas en tu fee distributor, puedes reclamar y distribuir todo su saldo usando el siguiente comando:
rocketpool node distribute-fees
Esto enviará tu parte de las recompensas a tu dirección de retiro.
send
Este comando te permite enviar ETH, RPL u otros tokens relacionados con Rocket Pool desde la wallet del nodo a una dirección diferente.
Esto puede ser útil si quieres mover tus fondos en la wallet a otro lugar.
La sintaxis para usar el comando send es así:
rocketpool node send <amount> <token> <address or ENS name>
Los argumentos son los siguientes:
<amount> es la cantidad del token a enviar.<token> es el token a enviar - esto puede ser eth, rpl, fsrpl (el antiguo token RPL heredado) o reth.<address or ENS name> es la dirección de Ethereum (o nombre ENS) a la que enviar los tokens.
Por ejemplo:
rocketpool node send 1 eth <my friend's address>
enviaría 1 ETH a mi amigo.
Comandos de Megapool
El grupo megapool es donde puedes acceder a todos los comandos usados para gestionar tu megapool y los validadores de tu megapool.
Esto es lo que mostrará rocketpool megapool help:
NAME:
   rocketpool megapool - Manage the node's megapool

USAGE:
   rocketpool megapool [global options] command [command options] [arguments...]

VERSION:
   1.19.1

COMMANDS:
   deposit, d                Make a deposit and create a new validator on the megapool. Optionally specify count to make multiple deposits.
   status, s                 Get the node's megapool status
   validators, v             Get a list of the megapool's validators
   repay-debt, r             Repay megapool debt
   reduce-bond, e            Reduce the megapool bond
   claim, c                  Claim any megapool rewards that were distributed but not yet claimed
   stake, k                  Stake a megapool validator
   exit-queue, x             Exit the megapool queue
   dissolve-validator, i     Dissolve a megapool validator
   exit-validator, t         Request to exit a megapool validator
   notify-validator-exit, n  Notify that a validator exit is in progress
   notify-final-balance, f   Notify that a validator exit has completed and the final balance has been withdrawn
   distribute, b             Distribute any accrued execution layer rewards sent to this megapool

GLOBAL OPTIONS:
   --help, -h  show help
A continuación se muestra un resumen de los comandos que normalmente usarás durante la operación habitual:
deposit
Este comando te permite crear nuevos validadores en tu megapool. Profundizaremos en él más adelante. Siéntete libre de saltar a Crear un Validador de Megapool si quieres una vista previa.
status
Este comando te proporciona información sobre el estado de tu megapool y los validadores gestionados por él. Podrás ver la dirección de tu megapool, el número de tickets de cola expréss, la dirección del delegado de tu megapool, el saldo ETH en la capa de ejecución y consenso, y mucha otra información útil. Aquí hay un ejemplo de la salida de rocketpool megapool status:
=== Megapool ===
The node has a megapool deployed at 0xCf3576c5A6e5a25AC00C9adb6751924BAe1680B1
The node has 0 express ticket(s).
The megapool has 9 validators.

=== Megapool Delegate ===
The megapool is using the latest delegate.
The megapool's effective delegate address is 0x138602A95956995280f1146aA9477d6B4E481B3c
The megapool has automatic delegate upgrades disabled. You can toggle this setting using 'rocketpool megapool set-use-latest-delegate'.

=== Megapool Balance ===
The megapool has 4.000000 node bonded ETH.
The megapool has 28.000000 RP ETH for a total of 32.000000 bonded ETH.
Megapool balance (EL): 32.051883 ETH
The megapool has 1 validators exiting. You'll be able to see claimable rewards once the exit process is completed.
Beacon balance (CL): 0.000000 ETH
Your portion: 0.000000 ETH
Current network commission: 5.000000%
validators
El comando rocketpool megapool validators te mostrará el estado de cada validador gestionado por el megapool de tu nodo. Podrás ver información como las claves públicas del validador, el estado en la Beacon Chain y la posición en la cola de los validadores en pre-stake:
There are 8 validator(s) on the express queue.
There are 2 validator(s) on the standard queue.
The express queue rate is 2.

1 Staking validator(s):

Megapool Validator ID:        1
Validator pubkey:             <pubkey>
Validator active:             no
Validator index:              <index>
Beacon status:                pending_queued
Express Ticket Used:          no


1 Initialized validator(s):

--------------------

Megapool Validator ID:        2
Expected pubkey:              <pubkey>
Validator active:             no
Validator Queue Position:     10
Express Ticket Used:          no


1 Exiting validator(s):

--------------------

Megapool Validator ID:        0
Validator pubkey:             <pubkey>
Validator active:             no
Validator index:              <index>
Beacon status:                withdrawal_done
Express Ticket Used:          yes
exit-validator
Este comando te permite seleccionar un validador para salir voluntariamente de la Beacon Chain. Úsalo cuando quieras cerrar un validador y retirar su saldo final de ETH. Ten en cuenta que esto no se puede deshacer: una vez que activas una salida, el validador se apagará permanentemente.
Comandos de Minipool
El grupo minipool implica comandos que afectan a tus minipools.
Como con el grupo node, cubriremos estos con más profundidad en la siguiente sección, pero puede ser útil verlos todos ahora.
Esto es lo que mostrará la salida de rocketpool minipool help:
NAME:
   rocketpool minipool - Manage the node's minipools

USAGE:
   rocketpool minipool command [command options] [arguments...]

COMMANDS:
   status, s                  Get a list of the node's minipools
   stake, t                   Stake a minipool after the scrub check, moving it from prelaunch to staking.
   set-withdrawal-creds, swc  Convert the withdrawal credentials for a migrated solo validator from the old 0x00 value to the minipool address. Required to complete the migration process.
   import-key, ik             Import the externally-derived key for a minipool that was previously a solo validator, so the Smart Node's VC manages it instead of your externally-managed VC.
   promote, p                 Promote a vacant minipool after the scrub check, completing a solo validator migration.
   refund, r                  Refund ETH belonging to the node from minipools
   begin-bond-reduction, bbr  Begins the ETH bond reduction process for a minipool, taking it from 16 ETH down to 8 ETH (begins conversion of a 16 ETH minipool to an LEB8)
   reduce-bond, rb            Manually completes the ETH bond reduction process for a minipool from 16 ETH down to 8 ETH once it is eligible. Please run `begin-bond-reduction` first to start this process.
   distribute-balance, d      Distribute a minipool's ETH balance between your withdrawal address and the rETH holders.
   exit, e                    Exit staking minipools from the beacon chain
   close, c                   Withdraw any remaining balance from a minipool and close it
   delegate-upgrade, u        Upgrade a minipool's delegate contract to the latest version
   find-vanity-address, v     Search for a custom vanity minipool address
   rescue-dissolved, rd       Manually deposit ETH into the Beacon deposit contract for a dissolved minipool, activating it on the Beacon Chain so it can be exited.

OPTIONS:
   --help, -h  show help
A continuación se muestra un resumen de los comandos que normalmente usarás.
status
Este comando simplemente proporciona un resumen de cada uno de tus minipools.
Esto incluye su estado actual, la dirección eth1 del minipool, la comisión sobre él (llamada node fee), la clave pública del validador ETH2 correspondiente y algunas otras cosas:
$ rocketpool minipool status

1 Staking minipool(s):

--------------------

Address:                <minipool eth1 address>
Penalties:             0
Status updated:        2025-07-15, 08:31 +0000 UTC
Node fee:              5.000000%
Node deposit:          8.000000 ETH
RP ETH assigned:       2025-07-14, 20:26 +0000 UTC
RP deposit:            24.000000 ETH
Minipool Balance (EL): 0.064202 ETH
Your portion:          0.018458 ETH
Available refund:      0.000000 ETH
Total EL rewards:      0.018458 ETH
Validator pubkey:      <validator eth2 address>
Validator index:       <validator eth2 index>
Validator active:      yes
Beacon balance (CL):   32.000347 ETH
Your portion:          8.000099 ETH
Use latest delegate:   no
Delegate address:      0x56903694d881282D33ed0643EAe14263880Dd47F
Rollback delegate:     <none>
Effective delegate:    0x56903694d881282D33ed0643EAe14263880Dd47F
refund
Este comando te permite recuperar 16 ETH de un minipool si depositaste 32 ETH para crear uno, una vez que Rocket Pool pudo contribuir 16 ETH del pool de staking rETH.
exit
Este comando envía una salida voluntaria para tu validador en la Beacon Chain.
Úsalo cuando quieras cerrar un validador y retirar su saldo final de ETH.
Ten en cuenta que esto no se puede deshacer - una vez que activas una salida, el validador se apagará permanentemente.
Flags Útiles
Hay algunos flags globales útiles que puedes agregar a algunos de los comandos anteriores, que quizás quieras aprovechar.
Establecer una Tarifa Máxima Personalizada o Tarifa de Prioridad (Precio de Gas)
A partir del hardfork de London de ETH1 en julio de 2021, las transacciones de Ethereum ya no usan un solo precio de gas para sus transacciones.
En su lugar, las transacciones modernas de Ethereum usan dos valores:
- La tarifa máxima, que describe el precio máximo absoluto de gas que estás dispuesto a aceptar en una transacción
- La tarifa de prioridad máxima, que describe la cantidad máxima que estás dispuesto a "dar propina" al minero por incluir tu transacción en un bloque
CONSEJO
La forma en que funcionan estos dos valores puede ser un poco complicada, así que aquí hay algunos ejemplos simples.
Digamos que la tarifa de red actual, llamada tarifa base, está en 50 gwei.
Envías una transacción con una tarifa máxima de 80 gwei y una tarifa de prioridad de 2 gwei.
Debido a que la tarifa base de la red es más baja que tu tarifa máxima, esta transacción podría ser recogida en el bloque actual.
Te costaría 50 gwei por la tarifa base y 2 gwei por la tarifa de prioridad; aunque estableciste tu tarifa máxima en 80, solo te costaría 52 gwei en total.
Como otro ejemplo, digamos que tienes esa misma transacción, pero ahora la tarifa base de la red es 100 gwei.
Dado que 100 gwei es mayor que tu tarifa máxima de 80 gwei, tu transacción no será incluida en este bloque.
En su lugar, simplemente permanecerá en el pool de transacciones hasta que la tarifa base sea lo suficientemente baja como para incluirla.
Ahora, digamos que la tarifa base actual es 50 gwei nuevamente, y tu transacción tiene una tarifa máxima de 80 gwei y una tarifa de prioridad de 4 gwei.
Se ejecutaría con un costo total de 54 gwei.
La tarifa de prioridad de 4 gwei aseguraría que se incluya delante de todas las transacciones con una tarifa de prioridad más baja.
Si realmente quieres que la transacción pase sin importar el costo, puedes establecer la tarifa de prioridad para que sea la misma que la tarifa máxima.
Esto emula el comportamiento del gas heredado, por lo que tu transacción usará todo el gas que le des - independientemente de si la tarifa base de la red es más baja que tu tarifa máxima o no.
Por defecto, Rocket Pool usará un oráculo para mirar el pool de transacciones actual y sugerir una tarifa máxima razonable para cualquier transacción que actives.
Usa EtherChain para su oráculo de sugerencia principal, y Etherscan como respaldo.
Si lo prefieres, puedes establecer una tarifa máxima personalizada (en gwei) que estarías dispuesto a pagar con el flag -f.
También puedes establecer una tarifa de prioridad personalizada con el flag -i.
Para hacer esto, agrégalos después de rocketpool y antes de la otra información del comando.
Por ejemplo, llamar a node set-timezone con este flag proporcionaría la siguiente salida:
$ rocketpool -f 10 node set-timezone

Would you like to detect your timezone automatically? [y/n]
n

Please enter a timezone to register with in the format 'Country/City':
Australia/Brisbane

You have chosen to register with the timezone 'Australia/Brisbane', is this correct? [y/n]
y

Using the requested max fee of 10.00 gwei (including a max priority fee of 2.00 gwei).
Total cost: 0.0005 to 0.0007 ETH
Are you sure you want to set your timezone? [y/n]
Esto muestra que independientemente de la tarifa máxima que recomiende la red, usará tu tarifa máxima personalizada de 10 gwei (y tarifa de prioridad si la especificas) en su lugar al enviar esta transacción.
NOTA
Si estableces una tarifa máxima manual, te recomendamos encarecidamente que uses un oráculo de precio de gas de terceros como EtherChain para determinar si esa tarifa es lo suficientemente alta para las condiciones actuales de la red antes de enviar la transacción.
Cancelar / Sobrescribir una Transacción Atascada
A veces, podrías encontrarte con un escenario en el que enviaste una transacción a la red pero usaste un precio de gas que es demasiado bajo para las condiciones de la red, y tomará un tiempo prohibitivamente largo ejecutarse.
Dado que todas tus transacciones subsiguientes esperarán hasta que esa pase, esa transacción esencialmente bloquea todas las operaciones en tu nodo de Rocket Pool.
Para lidiar con esta situación, hemos agregado un flag global que te permite "cancelar" tal transacción reemplazándola con algo más.
Cada wallet de Ethereum, incluida tu wallet de nodo, envía transacciones secuencialmente.
Cada transacción que envías tiene un número llamado nonce que identifica dónde vive en esa secuencia.
La primera transacción que envíes tendrá un nonce de 0, la siguiente que envíes tendrá un nonce de 1, y así sucesivamente.
Esta técnica de sobrescritura implica enviar una nueva transacción que usa el mismo nonce que tu transacción atascada existente, pero idealmente incluirá un precio de gas más alto que la atascada.
Esto significa que la nueva será minada primero.
Tan pronto como se mine en un bloque, la antigua será descartada de la red como si nunca se hubiera enviado.
Para usar este flag, primero necesitas encontrar el nonce de tu transacción atascada:
- Ve a un explorador de bloques ETH1 como https://etherscan.io.
- Navega a la dirección de tu wallet y mira la lista de transacciones.
- Repasa ellas, comenzando con la más reciente, hasta que encuentres la más lejana en la lista que tenga el estado
Pending.
- Marca el
nonce de esa transacción. Eso es lo que necesitarás.
Una vez que lo tengas, simplemente llama a cualquier transacción con la CLI usando los flags --nonce <value> -i 2.2 después de rocketpool y antes del resto del comando.
NOTA
Debes incluir el flag -i (tarifa de prioridad) para sobrescribir una transacción anterior.
Este número debe ser al menos un 10% más alto que la tarifa de prioridad que usó tu transacción anterior.
El Smartnode usa una tarifa de prioridad de 2 gwei por defecto, por lo que un valor de 2.2 suele ser suficiente para una sobrescritura.
Si tu transacción anterior usó una tarifa personalizada (digamos, 10 gwei), necesitarás establecerla al menos un 10% más alta en la transacción de sobrescritura (así que en este ejemplo, 11 gwei).
Como ejemplo, digamos que envié una transacción con un nonce de 10 y una tarifa máxima de 20 gwei, pero la tarifa de red actual es 100 gwei, por lo que mi transacción está atascada.
Para arreglarlo, enviaré una transacción donde envío una pequeña cantidad de ETH de mí mismo de vuelta a mí mismo con una tarifa máxima más alta (digamos, 150 gwei) y una tarifa de prioridad más alta.
Quemaré un poco de gas haciéndolo, pero desatascará la transacción rota:
$ rocketpool --nonce 10 -f 150 -i 2.2 node send 0.0001 eth <node wallet address>

Using the requested max fee of 150.00 gwei (including a max priority fee of 2.20 gwei).
Total cost: 0.0032 to 0.0032 ETH
Are you sure you want to send 0.000100 eth to <node wallet address>? This action cannot be undone! [y/n]
El stack de Smartnode verificará automáticamente para asegurarse de que el nonce que has proporcionado es válido (se refiere a una transacción pendiente) antes de enviarlo y desperdiciar tu gas accidentalmente.
Si no, devolverá un mensaje de error.
De lo contrario, pasará y te proporcionará los detalles de la transacción para que puedas monitorearlo y confirmar que, de hecho, sobrescribió tu transacción atascada anterior.
Eso es todo para los comandos comunes de la CLI.
En la siguiente sección, recorreremos cómo crear un minipool y comenzar a validar en la Beacon Chain.